
PLANNING & RESEARCH
· Used Blogger to post videos, links, images
· Created pie charts to present our audience research
· Used google for example film posters and magazines. Also viewed past blogs on Blogger.
· I’m used to using YouTube so it was easy. Searching up trailers for movies was easy as this is one of the main places films are promoted. Also used it for tutorials, which had helped me with Final Cut Pro.
· Used the internet to research trailers of movies, magazines and posters. Also researching horror directors like James Wan and Alfred Hitchcock, and the common conventions in horror genres, trailers and posters. This helped me to take note of conventions I found in supernatural horror and incorporate this into my own trailer and poster.
· We filmed behind the scenes footage of when we started to experiment with the shots. Also, videos on how we made our products.
· I watched horror movies such as Final Destination, Saw, The Grudge and Friday the 13th for inspiration. I think I benefited the most from Final Destination and The Grudge as I was able to understand elements that are put into a supernatural/psychological horror.
PRODUCTION/FILMING
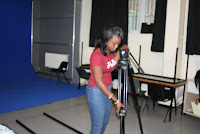
When learning how to film we had to go over the basics of how to use the video camera, still camera, and also the track as the technology was unknown to members of my group such as the Cannon EOS 7D.

We practiced using the camera we did a few pratice shots we used the track to do a tracking shot when we first started it was a bit difficult as we had to keep tracking at a steady pace so the shot was nice not jumpy, by the third attempt it was gradually was getting easy and by the fifth time i had mastered the shot and it was easy.
This was my 1st attempt at doing a tracking shot and I had forgotten about the lighting, lighting which is a key aspect when it comes to taking pictures or filming as without lighting you won’t be able to see most of the shots clearly enough for you to enjoy what you are watching. In this shot we can hardly see anything which is a big downfall as the people watching wont be able to enjoy the shot.
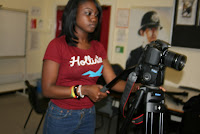
In my 2nd attempt I managed to use some of the lights to make the shot easier to see. It didn’t use a lot as I was trying to go for a low key lighting which reflects that the character is lonely. but there is enough lighting for the viewers to see.

At first we anticipated it would be hard to set up the tripod which is why we decide to do it prior to our filming so it would be easier for us when we had to film therefore saving time.putting the tripods on tracks was sometimes a challenge because of either the tripod may’ve have been broken in an area, or the track was not assembled in a way that we could fit the track Attempting to set up the tripod was the hardest but when my teacher showed me how to do it and it became easier now I and members of my team are pro’s and it is easier.
The main problems we faced was that the studio in kent were we was suppose to film was no longer available as an incident occured which meant the studio was not in further use but this did not affect us as we were still able to film in a different location. also another problem we had when applying light using the equipment was making sure that the light was too bright, because at times the background sheet we used would show, and the shot wouldn’t have the dark, grungy look that we aimed for in our trailer. It may’ve also indicated that we used a light source because of how bright it was. However we didn’t want it too dark because we
MOVIE POSTER & MOVIE MAGAZINE COVER
When learning how to film we had to go over the basics of how to use the video camera, still camera, and also the track as the technology was unknown to members of my group such as the Cannon EOS 7D.
We practiced using the camera we did a few pratice shots we used the track to do a tracking shot when we first started it was a bit difficult as we had to keep tracking at a steady pace so the shot was nice not jumpy, by the third attempt it was gradually was getting easy and by the fifth time i had mastered the shot and it was easy.

In my 2nd attempt I managed to use some of the lights to make the shot easier to see. It didn’t use a lot as I was trying to go for a low key lighting which reflects that the character is lonely. but there is enough lighting for the viewers to see.


At first we anticipated it would be hard to set up the tripod which is why we decide to do it prior to our filming so it would be easier for us when we had to film therefore saving time.putting the tripods on tracks was sometimes a challenge because of either the tripod may’ve have been broken in an area, or the track was not assembled in a way that we could fit the track Attempting to set up the tripod was the hardest but when my teacher showed me how to do it and it became easier now I and members of my team are pro’s and it is easier.

The main problems we faced was that the studio in kent were we was suppose to film was no longer available as an incident occured which meant the studio was not in further use but this did not affect us as we were still able to film in a different location. also another problem we had when applying light using the equipment was making sure that the light was too bright, because at times the background sheet we used would show, and the shot wouldn’t have the dark, grungy look that we aimed for in our trailer. It may’ve also indicated that we used a light source because of how bright it was. However we didn’t want it too dark because we
- During recordings, we all took turns to take pictures of the actor(s), behind the scenes etc.


The positioning of the lights was quite difficult as we needed most scenes to be completely dark, therefore not all lighting techniques went to plan. The lights we used mainly consisted of the Diva Lite 400 and the portable Diva Lite 401. Setting up the Diva Lite 400 required a lot of help at first as it was quite tricky to put together, however, we pulled through with practise and was able to set it up and take it done like real professionals.

Our group "Photoshop Master" used mainly PhotoShop when manipulating the magazine & poster. The benefits of Photoshop is that it allows ones creative talent to show. Ali's step by step video of creating our film poster and magazine can be viewed on our blog.

- Websites we used which contributed to our print production/ advertising was:
| Without YouTube, our group teaser trailer wouldn't be viewed and appreciated! |
| Blogger contributed greatly to our print production/ advertising as none of our hard work would have been viewed, recorded etc Blogger is the ultimate deication to our work. |
| Apple (The most important! Without the Apple macs, our group would've have struggled!) |
| These two social networks, helped greatly in advertising our group trailer to friends/ family/ others around the world! |
Health & Safety is important as there is many expensive equipment situtatedaround the working area etc. For information on how our group dealt with Health & Safety, refer to our Health and Safety post:
>> http://slamproductions4.blogspot.co.uk/2012/01/health-and-safety.html

 When following convetions of the magazine, we used Google images to view magazine covers and develop our own ideas, we also viewed past student work to help develop our final magazine cover. By reviewing other magazines, we were able to get a rough idea of how our magazine should look and what could be changed. Also, this proved to be helpful as we were able to follow, challenge and develop conventions when creating our film magazine.
EVALUATION POST-PRODUCTION
Once we had filmed all the appropriate footage that we needed for our trailer, we moved on to the editing aspect. Editing in film trailers is a very important element when it comes to the final product, and it takes the right type of editing to make a trailer effective. Methods used while editing film trailers include cuts, fades, captions, pacing and credits, which are all essential in making a successful horror movie trailer. To do our editing for the trailer, we used the Final Cut Pro program on Mac. We were not 100 per cent sure how to use the software, but after watching tutorials via YouTube, we understood how to use tools and effects to edit our trailer.
Once we finished editing our trailer, we needed to create the sound. We were told at the beginning of the course that we could make our own music, or ask to use an already created piece of music from the producer online. We decided to go for the first option as we wanted to be original with our final product. To create our sound, we originally decided to use the Garage Band software. We later decided however to use Soundtrack Pro as we found this much easier to operate with, and after watching a few tutorials, we started forming the sound. We searched through different categories in order to find a perfect soundtrack, and also selected some sound effects. We also included sounds that we had recorded ourselves, including screams, yelling, and the writing sound effect. Once done, we exported the sound and put this in iTunes, and then imported the MP3 file into the Final Cut Pro project of our trailer. We added the sound, exported the video as a Quicktime file and then we were able to upload this to YouTube.
We then moved on to editing the poster and magazine, which I (Ali) had done via Adobe Photoshop. After we took all our photos needed, I chose the two that I thought would work the best with our magazine and poster, and imported these in to Photoshop. I have made two videos below explain the stages I went through in order to produce these final products:
FILM POSTER for Red Ink
MAGAZINE COVER for Red Ink
0 comments:
Post a Comment